Introduction
Imagine this: you have finished doing a given gift, and you are going to collector a gift bag, only to realize that you are totally out of it. Or perhaps you have too small or too big bags or they do not fit your wrapping theme. Sound familiar? This irritating situation occurs to us all, particularly at the peak season of the holidays or when rushed to give last-minute gifts.
The positive part is that you can make a pretty, personalized gift bag easily since all one needs is wrapping paper and a few simple materials that you may already have in your house. Here, you will find out step-by-step directions on how to create professional-looking gift bags, as well as the creative decoration techniques to make them really unique.
Why waste time to create your own gift bags? To start with, it is extremely affordable, as you can make numerous bags with the cost of a single one purchased in the store. Second, it is a green option, which minimizes waste through recycling the materials you already possess. Lastly, handbags give it a personal touch that demonstrates to the recipient that you went out of your way to make their gift personal.
What You’ll Need / Supplies

The following materials are needed before getting down to the crafting process:
Basic Supplies:
- Paper wrapping (medium-weight or heavy-weight is preferable)
- Sharp scissors
- Tape, double-sided/ regular tape.
- Ruler or measuring tape
- Pencil for marking
- Hole punch
Optional Materials:
- Stapler to provide reinforcement.
- Decorative cord, twine or ribbon to use as handles.
- Bottom reinforcement cardboard piece.
- The decorative means (bows, stickers, stamps).
Tips on The Paper to use: The type and quality of wrapping paper you use will greatly affect the longevity and the appearance of your bag. Medium-weight paper is the most flexible and strong. Do not use very thin tissues papers as they are easily torn when subjected to pressure. Heavier craft paper or specialty wrapping paper stands the test of handling and weight.
In choosing patterns, take how they will appear when folded. Directional and large prints are likely to be choppy, and smaller patterns or solid colors will be more effective. Glossy papers are not always easy to work with as they crease and tape falls off.
Step-by-Step Instructions
Measuring and Cutting
The first step is to decide what size bag you want by the size of your gift. To the width of the paper, take the width of your gift and add 2-3 inches of seam allowance. The height: Have the height of your gift plus 4 to 5 inches in length, the additional length is what will make the top fold of the bag and also allow it to fold in.
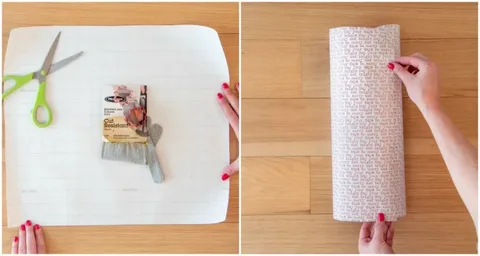
Cut your wrapping paper to the following size and have clean and straight edges. Scissors would not be as good as a paper trimmer or a ruler using a craft knife to achieve straight lines.
Creating the Basic Structure
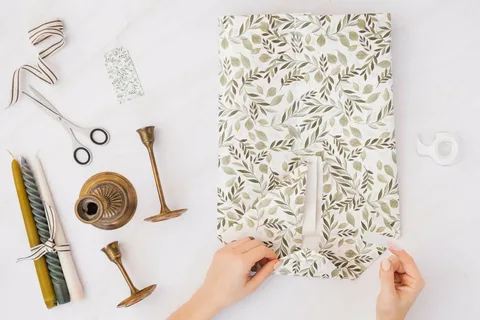
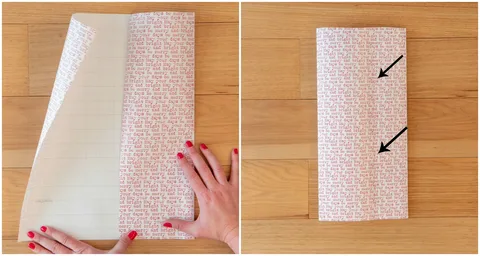
Place your paper downside up on a piece of furniture. Bend one long edge over approximately 1/2 inch and stick with double sided tape on this fold. Take the other end and bring it over forming a tube, and over the taped part by approximately 1/4 inch. Firmly press to hold the seam.
Forming the Bottom
In order to form the base of the bag, fold the tube at the bottom, pinch it and make it flat with the seam running at the center of the back. Draw the bottom flap into the bag by about 1-2 inches, depending on your preferred depth of the bag. Tape around the whole length.
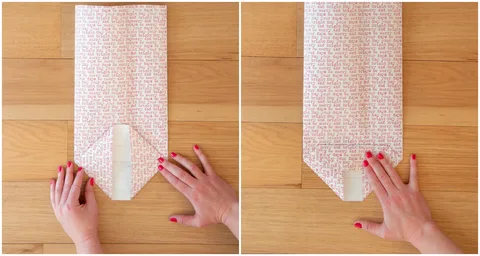
Unzip the tube and bend the bottom fold inwards to form a flat base. The ends will automatically make triangular shaped flaps – cut up and tape them on the inside walls of the bag to give it a clean and professional appearance.
Adding Side Gussets
To make bags with additional width, gussets should be made by inverting the sides of the bag. Measuring approximately 1 inch along each side edge, draw up a vertical line. Pull these folds toward the inside in order to increase the size of the bag without altering its formation.
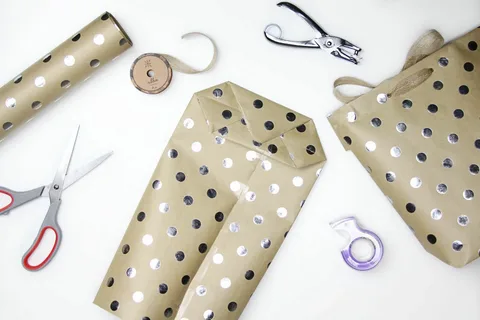
Installing Handles
Place handle marks Moleskine and place handle measures approximately 1 inch below the top edge and spacing the marks evenly on either side of the center. Make holes with a hole punch, or pierce with scissors to make small holes.
Divide ribbon or cord to length of choice, leaving some extra. The outside holes can be threaded then tied with secure knots on the inside. Tape the knots with small pieces of tape to ensure they are not torn off.
Finishing Touches
Turn the top of the bag by folding it down on the edge of the bag about 1-2 inches to form a clean cuff. Not only does it appear polished, but it also gives the handle area structural strength.
Tips & Tricks
The Quality of Paper: Invest in quality wrapping paper to use on the bags that you will use a lot. The bags made in the most durable ones are wedding gift wrapping, kraft paper, or specialty cardstock.
Pattern Alignment: In directional patterns, you will want to draw your cuts in such a way that the pattern appears natural to you. Never apply a seam along the areas of concentration of the pattern.
Batch Production: In case you are producing a number of bags to use in an event, then cut all the pieces first, and then assemble it in an assembly line. This is a far more efficient method and is consistent.
Reinforcement Strategies: With heavier gifts, the cut piece of cardboard is just a bit smaller than the base of the bag and should be taped into the bottom of the bag. This allows the bag not to tear and retain its shape.
Handle Strength: Pass the ribbons through holes or just place a small piece of tape over the inner knots to ensure that the handles do not pull through when under load.
Creative Variations & Personalization Ideas
Have basic bags, do these fun things to present them:
Handle Alternatives: Try braided ribbon, rope, strips of fabric or even twisted paper as an alternative handle. Gift coordinationThe coordination of handles with your gift theme gives it a harmonious appearance.
Decorative Elements: Add some personality to it with handwritten tags, metallic stamping, washi tape borders, or bow accents. Memorable presentations are made by seasonal decorations such as pinecones during the winter season or using pressed flowers in spring.
Repurposed Materials: Reuse old material such as old maps, sheet music, newspaper comics or scraps of fabric. Such unusual designs usually make the most intriguing and discussion worthy bags.
Theme Coordination: Pair your bag with certain events – metallic papers in anniversary, bright colors in birthdays, or neutral materials in fancy gift giving.
Common Mistakes & How to Avoid Them
Paper Tearing: This normally happens when the paper is too thin or the present is too heavy. Test the strength of your paper, and provide cardboard backing to heavy products.
Pattern Misalignment: Make sure to plan out what you are going to cut, particularly with directional or geometric patterns. Visualize the pattern with respect to the way it will appear after folding before cutting.
Handle Failure: Handles are removed by removing holes through excessively large holes, removing the paper through too thin paper or removing knots through insufficiently tight knots. Place with the correct holes and having a figure of 8 knots and putting tapes on where the knot is too big.
Poor Proportions: The bags that appear to be clunky are those that have been measured wrongly. Measure twice, cut once with a good allowance of seam and fold.
Why This DIY Gift Bag is a Great Choice
Making your own gift bags has many benefits other than merely addressing a short-term demand. Environmentally, you are minimizing waste brought about by using materials again and also not using single-use plastic bags that tend to end up in landfills.
The savings in terms of finances are easily accumulated, particularly when one gives gifts regularly. Each piece of wrapping paper may be used to form several bags thus this method proves to be a lot more cost effective than buying bags individually.
The aesthetic rewards are also overwhelming. The bags that are made by hand would perfectly match your wrapping paper and this would make a presentation that would appear to have been done by a professional. This minute detail does not go unmentioned and can even be included in the present itself.
It is, perhaps, best of all, the true gratification of being able to make something pretty and useful with your own hands. It is an easy process that is creative and can be customized fully to any event or recipient.
Conclusion
Gift bagging does not need any specialized equipment; it involves creativity, sustainability, and cost-effectiveness in a single rewarding project: wrapping paper into gift bags. It is possible to make high-quality bags using only a limited set of materials and even a few simple tricks, which perfectly fit any occasion connected to a present. It is faster to learn through practice and the end product can be much prettier than what was found in the store. Be it holidays, birthdays or events, this do-it-yourself method would guarantee you will not get caught without a perfect gift bag in the future. Today, make your first bag, and do not forget to share your photos of your work with social media or the comments section below, and we will be pleased to see your own design and creative versions!